티스토리 뷰
이제 AWS 리소스들을 코드를 사용하여 생성해보려고 합니다. 다양한 방법이 있겠지만 먼저 Terraform에 대해 알아보겠습니다.
https://www.terraform.io/intro
Introduction | Terraform by HashiCorp
Learn what Terraform is, what problems it can solve, and how it compares to existing software.
www.terraform.io
Terraform을 사용하기 전 먼저 AWS 리소스들을 생성할 것이기 때문에 AWS CLI를 설치하여 credentials 정보를 지정해주도록 하겠습니다.
1. AWS CLI 설치
아래 명령어를 통해 설치 파일을 다운로드 받고 .pkg 프로그램을 실행하여 설치합니다.
참고: https://docs.aws.amazon.com/ko_kr/cli/latest/userguide/install-cliv2-mac.html
$ curl "https://awscli.amazonaws.com/AWSCLIV2.pkg" -o "AWSCLIV2.pkg"
$ sudo installer -pkg AWSCLIV2.pkg -target /
터미널에서 aws --version 명령어를 통해 제대로 설치가 되었는지 확인합니다.
2. IAM 유저 생성
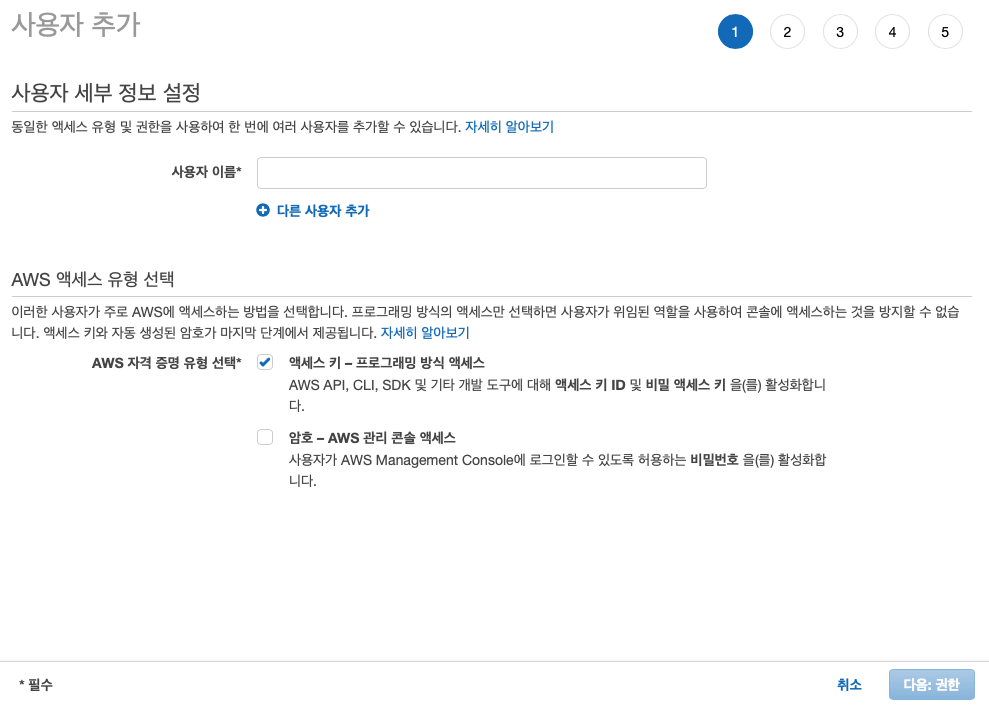
아래 과정을 통해 유저를 생성합니다. 추후에 다양한 리소스들을 생성해야되기 때문에 그에 알맞는 권한을 주어야 합니다.


유저를 생성하면 마지막에 Access Key와 Secret Access Key를 다운받을 수 있습니다. 이때 반드시 Access Key와 Secret Access Key를 다운받거나 저장해야합니다!
3. credentials 설정
이제 터미널에서 아래 명령어를 입력하여 Access Key와 Secret Access Key, default region을 설정합니다.
$ aws configure
AWS Access Key ID [None]: 다운받은_ACCESS_KEY
AWS Secret Access Key [None]: 다운받은_SECRET_ACCESS_KEY
Default region name [None]: ap-northeast-2
Default output format [None]:
설정된 인증정보 확인은 아래 명령어를 통해 가능합니다.
$ aws configure list
      Name                    Value             Type    Location
      ----                    -----             ----    --------
   profile                <not set>             None    None
access_key     ****************CDEF shared-credentials-file
secret_key     ****************IJKL shared-credentials-file
    region           ap-northeast-2      config-file    ~/.aws/config
이제 Terraform을 설치하고 도커로 nginx를 띄워보기 위해 docker desktop을 설치하겠습니다.
4. terraform 설치
맥에서는 brew 명령어를 사용하여 terraform 설치가 가능합니다.
$ brew tap hashicorp/tap
$ brew install hashicorp/tap/terraform
$ terraform -help
다른 OS의 경우 아래 링크를 참고하여 설치하시기 바랍니다.
https://learn.hashicorp.com/tutorials/terraform/install-cli?in=terraform/aws-get-started
Install Terraform | Terraform - HashiCorp Learn
Install Terraform on Mac, Linux, or Windows by downloading the binary or using a package manager (Homebrew or Chocolatey). Then create a Docker container locally by following a quick-start tutorial to check that Terraform installed correctly.
learn.hashicorp.com
5. docker desktop 설치
아래 사이트에서 docker desktop 설치가 가능합니다.
https://hub.docker.com/editions/community/docker-ce-desktop-mac
Docker Desktop for Mac by Docker | Docker Hub
Docker Desktop for Mac Docker Desktop for Mac is an easy-to-install desktop app for building, debugging, and testing Dockerized apps on a Mac. Docker Desktop for Mac is a complete development environment deeply integrated with the Mac OS Hypervisor framewo
hub.docker.com
6. nginx 도커로 띄우기
(1) docker desktop 실행
$ open -a Docker
(2) main.tf 파일 생성
terraform {
  required_providers {
    docker = {
      source  = "kreuzwerker/docker"
      version = "~> 2.13.0"
    }
  }
}

provider "docker" {}

resource "docker_image" "nginx" {
  name         = "nginx:latest"
  keep_locally = false
}

resource "docker_container" "nginx" {
  image = docker_image.nginx.latest
  name  = "tutorial"
  ports {
    internal = 80
    external = 8000
  }
}
(3) terraform 초기화
$ terraform init
(4) terraform 문법 확인
$ terraform plan
(5) terraform 실행
$ terraform apply
(6) 확인
브라우저에서 localhost:8000을 검색하면 아래와 같은 화면을 확인할 수 있습니다.

또한, 터미널에서 현재 실행 중인 도커 컨테이너를 확인할 수 있습니다.
$ docker ps
CONTAINER ID        IMAGE                     COMMAND                  CREATED             STATUS              PORTS                    NAMES
425d5ee58619        e791337790a6              "nginx -g 'daemon of…"   20 seconds ago      Up 19 seconds       0.0.0.0:8000->80/tcp     tutorial
(7) 정리
terraform으로 생성했던 nginx를 제거하는 방법은 아래 명령어를 사용하면 됩니다.
$ terraform destroy
지금까지 Terraform을 사용하기 전 준비를 진행하고 간단한 도커 이미지를 생성하는 작업을 수행해보았습니다. 이제부터는 AWS 리소스들을 하나씩 생성하는 방법을 알아보겠습니다.
'AWS' 카테고리의 다른 글
| [AWS PreSignedUrl] PreSignedUrl로 S3 Bucket에 파일 업로드 (0) | 2023.11.07 |
|---|---|
| [AWS KMS] KMS를 통한 암복호화 (2) | 2022.04.26 |
| [AWS CloudFront] CloudFront에서 API Gateway로 요청 전달 (0) | 2021.12.16 |
| [AWS APIGateway] API Gateway에서 private subnet의 NLB와 통신 (0) | 2021.12.16 |
| [AWS DocumentDB] AWS DocumentDB 생성 및 로컬 접속 (0) | 2021.12.16 |
- Total
- Today
- Yesterday
- 소수
- CodeDeploy
- Combination
- SWIFT
- CodeCommit
- Dynamic Programming
- programmers
- sort
- BFS
- Baekjoon
- DFS
- ionic
- Algorithm
- string
- array
- AWS
- EC2
- map
- permutation
- 조합
- search
- 순열
- CodePipeline
- cloudfront
- java
- 수학
- spring
- ECR
- 프로그래머스
- 에라토스테네스의 체
| 일 | 월 | 화 | 수 | 목 | 금 | 토 |
|---|---|---|---|---|---|---|
| 1 | 2 | 3 | 4 | 5 | 6 | 7 |
| 8 | 9 | 10 | 11 | 12 | 13 | 14 |
| 15 | 16 | 17 | 18 | 19 | 20 | 21 |
| 22 | 23 | 24 | 25 | 26 | 27 | 28 |
