티스토리 뷰
앱을 사용하다보면 지도를 사용해야 하는데 구글 지도를 앱에 추가하고 현재 기기의 위, 경도를 가지고 와서 표시하는 방법을 알아보겠습니다.
기본적으로 구글 API 공식 문서를 참고하여 구글 지도 API 를 가져와 표시하면 됩니다.
developers.google.com/maps/documentation/ios-sdk/start
Getting Started | Maps SDK for iOS | Google Developers
Once you’ve enabled billing, installed your preferred dependency manager and other software, and created an API key, you’re ready to download the Maps SDK for iOS and add a simple map. Complete release notes are available for each release of Maps SDK f
developers.google.com
1. API 추가하기
1.1. 프로젝트를 터미널로 열어 pod init 을 통해 podfile 을 생성합니다.
// CocoaPods 가 설치되어 있지 않은 경우 실행
sudo gem install cocoapods

pod init
1.2. podfile 을 열어서 설치할 API 를 추가합니다.
pod 'GoogleMaps', '4.0.0'
pod 'GooglePlaces', '4.0.0'
1.3. 터미널에서 pod install 을 통해 API 를 설치합니다.
pod install
1.4. Xcode 로 .xcworkspace 을 엽니다.
2. API Key 추가하기
developers.google.com/maps/documentation/ios-sdk/get-api-key#add_key
Maps SDK for iOS | Google Developers
Getting an API Key Now that you've set up billing and a project, enabled the SDK, and installed your preferred dependency manager and other software, you're prepared to create, add, and restrict your API key. Creating API keys The API key is a unique ident
developers.google.com
2.1. Google Cloud Platform 에 접속하여 앱에 맞는 프로젝트를 생성합니다.
2.2. 좌측 메뉴에서 API 및 서비스를 클릭한 뒤, "+ API 및 서비스 사용 설정" 을 클릭하면 원하는 API 및 서비스를 선택할 수 있습니다. 이때 Maps SDK for iOS 를 찾아 사용을 클릭합니다.

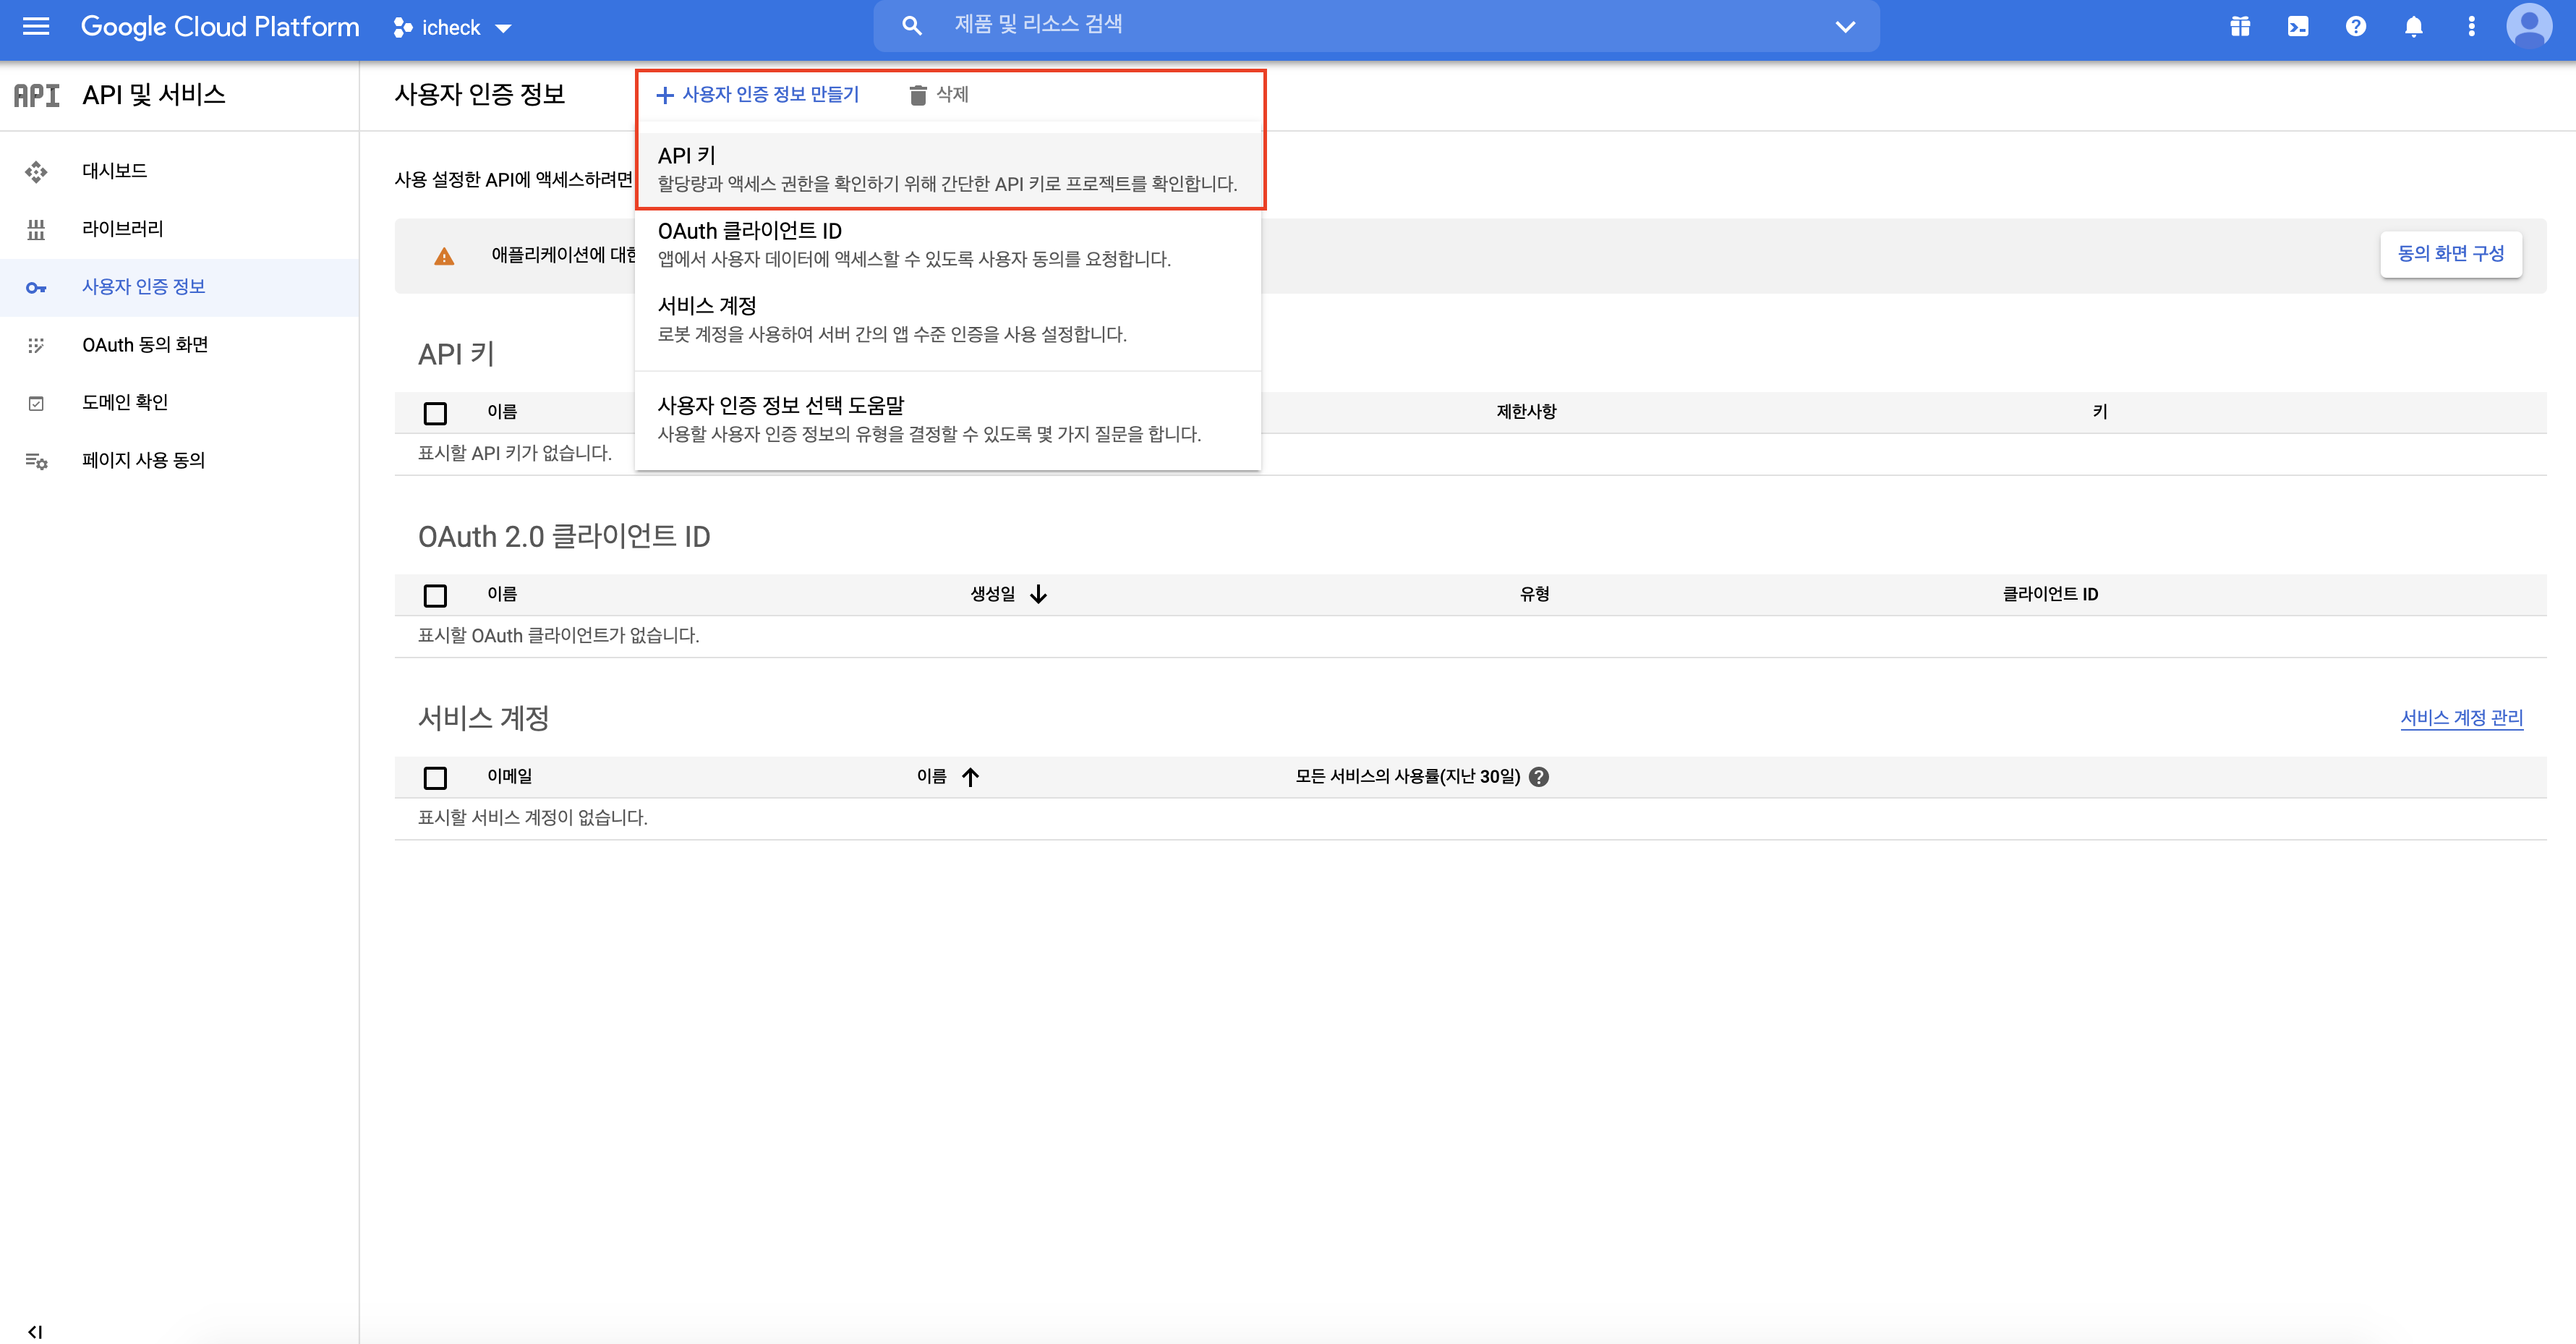
2.3. 다시 API 및 서비스 화면으로 이동한 뒤, 사용자 인증 정보 탭을 클릭하고 "+ 사용자 인증 정보 만들기" 에서 새로운 API 키를 생성합니다. 이때 생성되는 키 값을 복사해 둡니다.

2.4. 이렇게 만들어진 API 키를 프로젝트에 적용하기 위해 프로젝트에서 AppDelegate.swift 파일을 열어 아래 코드를 추가합니다.
import UIKit
import GoogleMaps  // 추가

@main
class AppDelegate: UIResponder, UIApplicationDelegate {

    var window: UIWindow?

    func application(_ application: UIApplication, didFinishLaunchingWithOptions launchOptions: [UIApplication.LaunchOptionsKey: Any]?) -> Bool {
        // Google Map API
        GMSServices.provideAPIKey("YOUR_API_KEY")  // 위에서 생성한 API Key를 YOUR_API_KEY 위치에 추가

        ...
        return true
    }

}
3. 지도 사용하기
지도를 사용하고자 하는 화면의 ViewController 에 아래 코드를 추가합니다.
import UIKit
import GoogleMaps

class MapViewController: UIViewController {

    override func viewDidLoad() {
        super.viewDidLoad()

        // 구글 지도 표시하기
        // Do any additional setup after loading the view.
        // Create a GMSCameraPosition that tells the map to display the
        // coordinate 37.566508,126.977945 at zoom level 16.
        let camera = GMSCameraPosition.camera(withLatitude: 37.566508, longitude: 126.977945, zoom: 16.0)
        let mapView = GMSMapView.map(withFrame: self.view.frame, camera: camera)
        self.view.addSubview(mapView)

        // Creates a marker in the center of the map.
        let marker = GMSMarker()
        marker.position = CLLocationCoordinate2D(latitude: 37.566508, longitude: 126.977945)
        marker.title = "Sydney"
        marker.snippet = "South Korea"
        marker.map = mapView
    }
}
앱을 실행하면 화면에 지도가 표시되고 지정한 위도(latitude) 와 경도(longitude) 에 마크가 표시된 것을 확인할 수 있습니다.
특정 위, 경도를 직접 입력하지 않고 기기의 위치 정보를 가져와 사용하는 방법을 알아보겠습니다.
1. info.plist 를 열어 "Privacy - Location When In Use Usage Description" 를 추가합니다.
*** Privacy - Location When In Use Usage Description : 앱이 사용중일때만 가져오기
*** Privacy - Location Always and When In Use Usage Description : 앱을 사용안해도 항상 가져오기

2. 위, 경도를 사용할 위치에 다음 코드를 추가합니다.
import UIKit
import CoreLocation
import GoogleMaps

class MapViewController: UIViewController, CLLocationManagerDelegate {

    var locationManager: CLLocationManager!

    override func viewDidLoad() {
        super.viewDidLoad()

        // 현재 위치 가져오기
        locationManager = CLLocationManager()
        locationManager.delegate = self

        // 앱이 실행될 때 위치 추적 권한 요청
        locationManager.requestWhenInUseAuthorization()
        // 배터리에 맞게 권장되는 최적의 정확도
        locationManager.desiredAccuracy = kCLLocationAccuracyBest
        // 위치 업데이트
        locationManager.startUpdatingLocation()

        // 위, 경도 가져오기
        let coor = locationManager.location?.coordinate

        let latitude = (coor?.latitude ?? 37.566508) as Double
        let longitude = (coor?.longitude ?? 126.977945) as Double

        ....
    }
}
위에서 직접 지도의 위, 경도 위치를 숫자로 입력하였는데 이 부분을 현재 위치의 위, 경도로 변경해주면 현재 위치가 보이고 마크가 표시된 것을 확인할 수 있습니다.

'swift > 개발' 카테고리의 다른 글
| [Swift 개발] Local Notification 사용하기 (0) | 2021.07.19 |
|---|---|
| Swift 개발 - UUID (0) | 2020.11.10 |
| Swift 개발 - Keychain 사용하여 데이터 저장하기 (0) | 2020.11.10 |
| Swift 개발 - HTTP 통신 (0) | 2020.11.08 |
| Swift 개발 - 화면 전환 (0) | 2020.11.04 |
- Total
- Today
- Yesterday
- CodeDeploy
- 소수
- ECR
- map
- 에라토스테네스의 체
- BFS
- java
- EC2
- 수학
- array
- CodePipeline
- string
- permutation
- ionic
- search
- 조합
- sort
- DFS
- Algorithm
- AWS
- 순열
- CodeCommit
- 프로그래머스
- Dynamic Programming
- Combination
- SWIFT
- Baekjoon
- programmers
- spring
- cloudfront
| 일 | 월 | 화 | 수 | 목 | 금 | 토 |
|---|---|---|---|---|---|---|
| 1 | 2 | 3 | 4 | 5 | 6 | 7 |
| 8 | 9 | 10 | 11 | 12 | 13 | 14 |
| 15 | 16 | 17 | 18 | 19 | 20 | 21 |
| 22 | 23 | 24 | 25 | 26 | 27 | 28 |
